Saturday, February 18, 2012

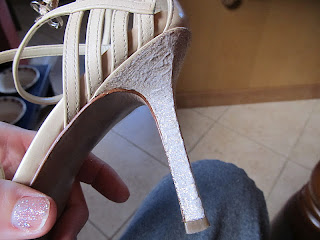
Glitter Heel Fix


I found this idea on Pinterest, and I am definitely going to be doing this to some of my heels. It seems very simple all you need is glitter (Martha Stewart, fine glitter is recommended), glue (mod podge), paint brush, paper plate, and a pair of heels.

Step 1. Place your glue on the plate, however much you feel is necessary.


Step 2. Mix your glue with your glitter.


Step 3. Make a thick paste.


Step 4. Place the mixture on your heel, let dry, and repeat.

Step 6. Enjoy your new pair of heels!


Three Bird Watchers Cross Stitch Update


I mentioned in my first post that I was in the middle of a cross stitch, and the above picture shows my progress so far, I started this project in Jan. of 2011 and even though I have done a lot of work on it I still have quite a bit to go. I will try to keep everyone posted on my progress with it because its definitely something that means a lot to me. Below is a picture of what the final product will look like.


Thursday, February 16, 2012

Magnetic Cosmetic Board


This is a very simple project to do, all you need is magnets, hot glue (and glue gun), metal sheet, and of course makeup! The one I made is pictured above.

I found a decorative piece of metal at Hobby Lobby, they have a ton of different designs to choose from, but I chose one with a zebra print boarder around it and a silly little saying on it. You don't have to buy a decorative one, there is always the option of buying a piece of sheet metal at Home depot, but I thought this looked nicer. The
se can range anywhere from $6.99-$19.00. Mine was 50% off at the time so I got it for $4.50. (picture below)
Next you need magnets, I also found these magnets at Hobby Lobby, but you can find these anywhere (Michael's, Jo Ann Fabrics, Target, Walmart). Make sure that they are thin enough so you can cut through them, but strong enough to hold up your makeup. As you can see they aren't that expensive, I only paid $1.47 for these. (picture below)

After you have your supplies all you need to do is cut the magnets into squares whatever size you see fit, and glue them to the back of your cosmetic items. Make sure that you have enough magnets on them so they are strong enough to hold your item. (Picture below)
Finally, hang your decorative piece of metal and place your cosmetic items on it. This is a great way to keep your bathroom counters clutter free!

Makeup Brush Holder


I saw this in a magazine a while back, and I thought that this would be the perfect way to store my makeup brushes. All you need is any rectangular or oval shaped vase, and any type of filler you would like to use (sand, rocks, beads, etc.). Put the filler of your choice into the vase without over flowing it and your brushes will stay upright and tidy. I only needed 1 bag of sand, but you should buy what you need in order to fill up your vase. Both of these items shown below can be purchased at craft stores, I went to Michael's for my supplies. And the vase was $9.99, and the sand was $2.99. If your lucky they might have a coupon in their store ad, I got my vase 50% off because of a coupon. The one pictured above is the one that I made.


Start to something great!

I have never written a blog before, and I'm hoping that people who read this will enjoy it. My plan for this blog is to be about crafts. I'm thinking about having how-to directions on here when I find a cool craft idea. Some I will try to make myself, but others I will probably just post about the idea. I'm definitely not a pro crafter or anything, just somebody looking for fun.

I'm already in the middle of a few projects right now, one being a cross stitch which I started in Jan. of 2011. The other project I'm working on right now is my forever ongoing scrapbook (which is never really finished). I will try to post as much as I can, but I am still a busy girl.

Thanks for reading...Happy Crafting!